Assalamualaikum...

Monday, 3 December 2012

How to solve equation ~ Mathematics for Form 2

How to solve equations 


a) Discuss the Instructional elements in the video

Constructivism approaches :
This video teach step by step how to solve the equation, so it is a learning process which allows a student to experience an environment first-hand, thereby, giving the student reliable, trust-worthy knowledge. The student is required to act upon the environment to both acquire and test new knowledge.  

Behavioral approaches :
    1. Breaking down the skills and information to be learned into small units.
    2. Checking student's work regularly and providing feedback as well as encouragement (reinforcement).
    3. Teaching "out of context." Behaviorists generally believe that students can be taught best when the focus is directly on the content to be taught. Behavioral instruction often takes the material out of the context in which it will be used.
    4. Direct or "teacher centered" instruction.


2) Explain the advantages and disadvantages of the video especially for learning.
Advantages : Students learns step by step how to solve equation.
Disadvantages : Students can't ask teacher if they are not understand.


Monday, 18 June 2012

Revision

1.      Bincangkan langkah-langkah bagaimana untuk menghasilkan satu sistem inventori atas talian mengenai penyimpanan rekod peminjaman alatan komputer ditempat anda bekerja menggunakan ASP menerusi Dreamweaver.
Pastikan perbincangan anda mengandungi elemen ASP seperti Recordset, Insert Record dan sebagainya. Ambilkira juga isu keselamatan dalam menghasilkan aplikasi tersebut.

Langkah 1 : Daftarkan fail pangkalan data di dalam Ms Access
1. Bina pangkalan data baru, Blank Database
2. Masukkan field ID, names, username, pswd, mesej  dan nama alat.
3.  Untuk field pswd, data type diubah kepada password, mesej diubah kepada memo.
4. Save fail sebagai Table1 dan disimpan di dalam C:/inetpub/wwwroot/data
5. Nama pangkalan data ialah data.mdb dan disimpan di dalam Ms Access.
6. Tutup fail pangkalan data dan Ms Access.

Langkah 2 : Bina site
1. Bina satu site bernama inventori.
2. HTTP address is http://localhost/inventori/
3. Pilih Yess, I want to use a server technology dan server technology yang digunakan ialah ASP VBScript.
4. Fail disimpan di C: \inetpub\wwwroot\inventori

Langkah 3 : Bina Connection
1. Dalam dreamweaver, buka fail ASP dan pilih Windows>Database.
2. Klik pada tanda '+' dan pilih Custom Connection String.
3. Masukkan Connection Name itu sebagai dmx. Masukkan Connection String dan pilih using driver on testing server.
4. Test connection, berjaya dan klik Ok.

Langkah 4 : Bina Form
1. Bina page baru File>New>Blank Page>ASP VBScript>Create
2. Masukkan form, binakan kotak menggunakan Table.
3. Masukkan text dan text field di dalam kotak-kotak table untuk name, username, password, mesej dan nama alat.
4. Masukkan satu button dan namakan sebagai simpan.
5. untuk setiap text box, ia dinamakan sebagai apa yg dinamakan di dalam pangkalan data.
6. Untuk text field password, jenis paparan ditukar sebagai password.
7. Form disimpan sebagai daftar.asp

Langkah 5 : Masukkan data di dalam pangkalan data menggunakan Insert Record
1.Pada fail daftar.asp.
2. Aktifkan server behavior tab dan klik "+" dan pilih insert record.
3. Pilih dmx connection, kemudian klik Ok.
4. Fail disimpan

Langkah 6 : Membina dan menyemak  nama ahli dan kata laluan
1.      Binakan satu fail login yang mengandungi nama ahli dan kata laluan.
2.      Pada server behaviors, pilih User Authentication> Log In User.
3.      Tetapkan spesifikasi antaranya dapatkan nama pengguna dan kata laluan. Maklumat kata laluan diperoleh dari table kata laluan.
4.      Setkan juga ke mana pengguna akan pergi jika username dan passwordnya betul dan sebaliknya.
5.      Tetapkan juga Restrict Access Based on username and password jika pengguna bukan admin.

Sunday, 3 June 2012

Jam digital

Salam...
Hari ni memang cadangannya nak study Authoring System... Cuaca pun macam merestui sahaja... sebab kalau panas sangat tak best, kalau hujan dan ada guruh... tak boleh pula nak online...

So, terus menggoogle... cari apa-apa yang best... hari tu masa Fadlee dan Halizah cari buku kat PSZ, saya tak joint... so, kenalah cari bahan untuk flash guna Mr Google.

Alhamdulillah terjumpa satu website yang sangat bagus bagi flash beginner macam saya ni

                                           http://www.entheosweb.com/Flash

Dalam website ni, ada banyak tutorial tentang flash... sambil tu boleh study and learn step by step... kalau tak jadi juga... ada disediakan fail .fla sebagai rujukan....

Saya berminat dengan satu fail iaitu membina jam digital... mudahnya...Mari kita cuba

Flash Digital Clock 

STEPS TO FOLLOW

  1. Insert 3 layers in your timeline window and name them, "background", "text" and "actions". Similar to the one shown below


  2. Select Frame1 of background layer, Design the framework for your digital clock.
  3. Select frame2 and press F5

  4. Now go to Frame1 of your text layer and insert Dynamic text field in your work area. Select frame2 and press F5

    To insert a Dynamic text field- Select text tool from your tool box,
    Select Dynamic text from Text pop-up menu in the Property inspector.
    Click on your work area wherever you want the digital clock to appear.

  5. Name this Dynamic text field instance as "clock_txt"
  6. Go to frame1 of actions layer. Copy and paste the below mentioned script in the action panel

    time=new Date(); // time object
    var seconds = time.getSeconds()
    var minutes = time.getMinutes()
    var hours = time.getHours()
    if (hours<12) {
    ampm = "AM";
    }
    else{
    ampm = "PM";
    }
    while(hours >12){
    hours = hours - 12;
    }
    if(hours<10)
    {
    hours = "0" + hours;
    }
    if(minutes<10)
    {
    minutes = "0" + minutes;
    }
    if(seconds<10)
    {
    seconds = "0" + seconds;
    }
    clock_txt.text = hours + ":" + minutes + ":" + seconds +" "+ ampm;


  7. Now go to frame2 of actions layer and press F6 to insert a new keyframe.
    Still keeping the play head on the frame2, go to action panel and copy paste the below mentioned script.

    gotoAndPlay(1);
Congratulations!! your digital clock is ready.
Press Ctrl+Enter to view your clock.

Berikut adalah hasil yang telah saya buat.

Saya ada uploadkan failnya di https://sites.google.com/site/authormasni/

Cubalah...


Tuesday, 29 May 2012

Refleksi - Aktiviti-aktiviti dari apps4

Alhamdulillah, selesai juga tugasan di dalam apps4.

Sila rujuk : https://sites.google.com/site/authormasni/


Semoga ilmu yang perolehi memberi manfaat pada diri dan pengguna aplikasi.

Sunday, 27 May 2012

Reflection for Apps 4 - Types of interaction

Question 1
Create a multiple choice question that will provide a correct or  incorrect  response upon your answer. Please follow below example.

Saya cuba membuat soalan aneka pilihan dengan merujuk Ipad. Alhamdulillah berikut adalah langkah-langkahnya.

1- New file, pada time line...
2- Layer Question - Taipkan soalan sahaja.


3- Layer Button - Binakan 4 button untuk jawapan.

Action script untuk setiap button
 jika jawapan salah - on (release) {respon = "Cuba lagi."}
 jika jawapan betul - on (release) {respon = "Tahniah"}


4- Layer Respon - mengandungi text field berjenis dynamix text. Ia digunakan sebagai respon kepada pengguna jika jawapan yang dipilih benar atau salah.


5- Layer action diletakkan action script stop untuk memastikan paparan tidak diulang tanpa henti.


Question 2 :
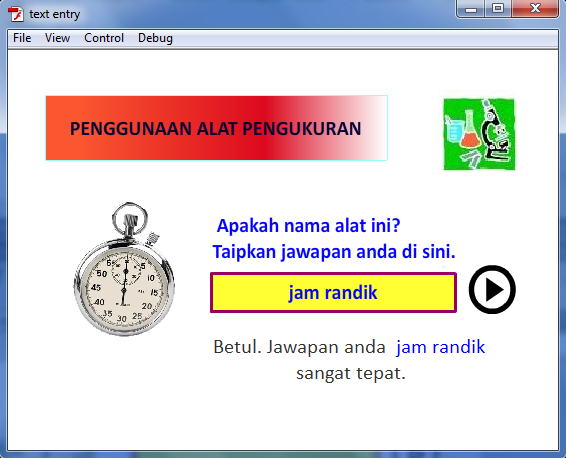
Create one application that allows users to type an input of question provided. Follow below example.

1- Layer background - taipkan tajuk/ tema soalan - static text
2- Layer question - a) taipkan soalan kuiz - static text
                               b) masukkan text entry sebagai input text.
                                    ->Pengguna akan masukkan jawapan di sini.
                               c)  masukkan text entry sebagai dynamix text.
                                    ->Pengguna akan dapat respon tentang jawapan yang diberi.


3- Layer button - pilih satu button play dari library
                          - pada button tersebut, taipkan action script untuk semak jawapan pengguna.

on (release) { if (answer == "jam")
{respon = "Correct!";}
else
{respon = "Incorrect. Your answer "+ answer +" is incorrect.";
}
}

on (release, keyPress "<Enter>")
{if (answer == "jam") {respon = "Correct!";}
else
{respon = "Incorrect. Your answer "+ answer +" is incorrect.";
}
}

4- Layer stop
taipkan action script  stop ( );


Question 3 : 
Create a Main Menu that contain following actions :
 - A button that navigate from 1 page to another
 We can use action script to link one scene with other scene.
  Put this action script behind the button.
  on (release) {gotoAndPlay(" scene name", frame number);}  


 - A button that navigate from 1 scene to particular frame of different scene 


 - A button that navigate users to other webpage.
The action script to link one scene to other webpage.
on (release) {getURL("http://www.moe.gov.my/jpnjohor/v6/index2.php");}


Question 4
Based on your own creativity, create a simple flash applications that involves drag and drop function like an example below.

Layer epal - import from library picture of apple
Layer pokok - import from library picture of tree
Behind a movie clip of each apple, write down this action script :

on (press) { startDrag(this, true); }
on (release){stopDrag();}

// Tq Miss Farhana because you teach me how to do this activity.

Paparan pada fail Flash

 Paparan apabila fail dimainkan


 Paparan setelah buah epal di drag n drop pada pokok.


Alhamdulillah, siap juga akhirnya latihan apps4 yang diberikan sejak 2 minggu yang lalu. Thanks pada Dr Zaida, Cik Nurul Farhana serta kawan-kawan yang telah membantu menyiapkan latihan ini.


Wednesday, 23 May 2012

Reflection Apps 2 - Drawing in Flash


Apps 2 – Drawing in Flash 

1. Draw  a view of the beach as in example.


2. Explain the tools that you are using during this activity
·         Line tool digunakan untuk membina garis lurus.
·         Pilih selection tools untuk membengkokkan garis lurus bagi membentuk gunung,  ikan, burung, bintang, sampan, kerusi dan payung.
·         Gunakan subselection tool untuk mengubah kedudukan lukisan.
·         Pencil tool digunakan untuk melukis garisan bengkok seperti tali yang mengikat sampan
·         Jika nak bawa objek yang sama ke tempat lain contohnya ikan, maka gunakan Free Transform Tool untuk select and paste ke tempat lain.
·         Shape tool  digunakan untuk melukis bentuk geometri seperti segiempat, oval, poligon.
·         Pastikan garisan tidak putus supaya tiada masalah semasa mewarna lukisan nanti.
      3. Once you are done, colour your drawn image with an appropiate tool in flash. Describe the tools that you are using.
·         Brush tool digunakan untuk mewarna.
·         Untuk menghasilkan warna yang ada tone, boleh ubah di bahagian properties.
·         Gunakan Paint bucket tools untuk mewarnakan imej. Pastikan imej tidak mempunyai garisan terputus jika nak gunakan paint bucket tools. 


4. Create a new flash file and draw a cartoon image using Onion Skin Tools, and then convert it to graphic symbol.


Step : 
Google picture of Sizuka... 
Open New file in Flash... 
F7 to insert new frame... 
Import file to library... 
Drag the picture of Sizuka in frame one... 
Activate the onion skin...
Trace the picture on frame two... 
Finished trace... 
Delete frame one... 
To colour the picture... 
Using brush tools and paint bucket...

Saturday, 12 May 2012

Differences between motion tweens and classic tweens

Flash Pro supports two different types of tweens for creating motion. Motion tweens, introduced in Flash CS4 Professional, are powerful and simple to create. Motion tweens allow the greatest control over tweened animation. Classic tweens, which include all tweens created in earlier versions of Flash Pro, are more complex to create. While motion tweens offer much more control of a tween, classic tweens provide certain specific capabilities that some users need.
The differences between motion tweens and classic tweens include the following:
  • Classic tweens use keyframes. Keyframes are frames in which a new instance of an object appears. Motion tweens can only have one object instance associated with them and use property keyframes instead of keyframes.
  • A motion tween consists of one target object over the entire tween span. Classic tween allows tweening between two keyframes, containing instances of the same or different symbols.
  • Both motion tweens and classic tweens allow only specific types of objects to be tweened. When you apply a motion tween to non-allowed object types, Flash offers to convert them to a movie clip when the tween is created. Applying a classic tween converts them to graphic symbols.
  • Motion tweens consider text a tweenable type and do not convert text objects to movie clips. Classic tweens convert text objects to graphic symbols.
  • No frame scripts are allowed on a motion tween span. Classic tweens allow frame scripts.
  • Any object scripts on a tween target cannot change over the course of the motion tween span.
  • Motion tween spans can be stretched and resized in the Timeline and are treated as a single object. Classic tweens consist of groups of individually selectable frames in the Timeline.
  • To select individual frames in a motion tween span, Ctrl-click (Windows) or Command-click (Macintosh) the frames.
  • With classic tweens, eases can be applied to the groups of frames between the keyframes within the tween. With motion tweens, eases apply across the entire length of a motion tween span. Easing only specific frames of a motion tween requires the creation of a custom ease curve.
  • You can use classic tweens to animate between two different color effects, such as tint and alpha transparency. Motion tweens can apply one color effect per tween.
  • Only motion tweens can be used to animate 3D objects. You cannot animate a 3D object using a classic tween.
  • Only motion tweens can be saved as Motion Presets.
  • With motion tweens, you cannot swap symbols or set the frame number of a graphic symbol to display in a property keyframe. Animations that include these techniques require classic tweens.
  • There can be more than one classic or motion tween on the same layer, but there can't be both types of tween on the same layer.