Assalamualaikum...

Monday, 3 December 2012

How to solve equation ~ Mathematics for Form 2

How to solve equations 


a) Discuss the Instructional elements in the video

Constructivism approaches :
This video teach step by step how to solve the equation, so it is a learning process which allows a student to experience an environment first-hand, thereby, giving the student reliable, trust-worthy knowledge. The student is required to act upon the environment to both acquire and test new knowledge.  

Behavioral approaches :
    1. Breaking down the skills and information to be learned into small units.
    2. Checking student's work regularly and providing feedback as well as encouragement (reinforcement).
    3. Teaching "out of context." Behaviorists generally believe that students can be taught best when the focus is directly on the content to be taught. Behavioral instruction often takes the material out of the context in which it will be used.
    4. Direct or "teacher centered" instruction.


2) Explain the advantages and disadvantages of the video especially for learning.
Advantages : Students learns step by step how to solve equation.
Disadvantages : Students can't ask teacher if they are not understand.


Monday, 18 June 2012

Revision

1.      Bincangkan langkah-langkah bagaimana untuk menghasilkan satu sistem inventori atas talian mengenai penyimpanan rekod peminjaman alatan komputer ditempat anda bekerja menggunakan ASP menerusi Dreamweaver.
Pastikan perbincangan anda mengandungi elemen ASP seperti Recordset, Insert Record dan sebagainya. Ambilkira juga isu keselamatan dalam menghasilkan aplikasi tersebut.

Langkah 1 : Daftarkan fail pangkalan data di dalam Ms Access
1. Bina pangkalan data baru, Blank Database
2. Masukkan field ID, names, username, pswd, mesej  dan nama alat.
3.  Untuk field pswd, data type diubah kepada password, mesej diubah kepada memo.
4. Save fail sebagai Table1 dan disimpan di dalam C:/inetpub/wwwroot/data
5. Nama pangkalan data ialah data.mdb dan disimpan di dalam Ms Access.
6. Tutup fail pangkalan data dan Ms Access.

Langkah 2 : Bina site
1. Bina satu site bernama inventori.
2. HTTP address is http://localhost/inventori/
3. Pilih Yess, I want to use a server technology dan server technology yang digunakan ialah ASP VBScript.
4. Fail disimpan di C: \inetpub\wwwroot\inventori

Langkah 3 : Bina Connection
1. Dalam dreamweaver, buka fail ASP dan pilih Windows>Database.
2. Klik pada tanda '+' dan pilih Custom Connection String.
3. Masukkan Connection Name itu sebagai dmx. Masukkan Connection String dan pilih using driver on testing server.
4. Test connection, berjaya dan klik Ok.

Langkah 4 : Bina Form
1. Bina page baru File>New>Blank Page>ASP VBScript>Create
2. Masukkan form, binakan kotak menggunakan Table.
3. Masukkan text dan text field di dalam kotak-kotak table untuk name, username, password, mesej dan nama alat.
4. Masukkan satu button dan namakan sebagai simpan.
5. untuk setiap text box, ia dinamakan sebagai apa yg dinamakan di dalam pangkalan data.
6. Untuk text field password, jenis paparan ditukar sebagai password.
7. Form disimpan sebagai daftar.asp

Langkah 5 : Masukkan data di dalam pangkalan data menggunakan Insert Record
1.Pada fail daftar.asp.
2. Aktifkan server behavior tab dan klik "+" dan pilih insert record.
3. Pilih dmx connection, kemudian klik Ok.
4. Fail disimpan

Langkah 6 : Membina dan menyemak  nama ahli dan kata laluan
1.      Binakan satu fail login yang mengandungi nama ahli dan kata laluan.
2.      Pada server behaviors, pilih User Authentication> Log In User.
3.      Tetapkan spesifikasi antaranya dapatkan nama pengguna dan kata laluan. Maklumat kata laluan diperoleh dari table kata laluan.
4.      Setkan juga ke mana pengguna akan pergi jika username dan passwordnya betul dan sebaliknya.
5.      Tetapkan juga Restrict Access Based on username and password jika pengguna bukan admin.

Sunday, 3 June 2012

Jam digital

Salam...
Hari ni memang cadangannya nak study Authoring System... Cuaca pun macam merestui sahaja... sebab kalau panas sangat tak best, kalau hujan dan ada guruh... tak boleh pula nak online...

So, terus menggoogle... cari apa-apa yang best... hari tu masa Fadlee dan Halizah cari buku kat PSZ, saya tak joint... so, kenalah cari bahan untuk flash guna Mr Google.

Alhamdulillah terjumpa satu website yang sangat bagus bagi flash beginner macam saya ni

                                           http://www.entheosweb.com/Flash

Dalam website ni, ada banyak tutorial tentang flash... sambil tu boleh study and learn step by step... kalau tak jadi juga... ada disediakan fail .fla sebagai rujukan....

Saya berminat dengan satu fail iaitu membina jam digital... mudahnya...Mari kita cuba

Flash Digital Clock 

STEPS TO FOLLOW

  1. Insert 3 layers in your timeline window and name them, "background", "text" and "actions". Similar to the one shown below


  2. Select Frame1 of background layer, Design the framework for your digital clock.
  3. Select frame2 and press F5

  4. Now go to Frame1 of your text layer and insert Dynamic text field in your work area. Select frame2 and press F5

    To insert a Dynamic text field- Select text tool from your tool box,
    Select Dynamic text from Text pop-up menu in the Property inspector.
    Click on your work area wherever you want the digital clock to appear.

  5. Name this Dynamic text field instance as "clock_txt"
  6. Go to frame1 of actions layer. Copy and paste the below mentioned script in the action panel

    time=new Date(); // time object
    var seconds = time.getSeconds()
    var minutes = time.getMinutes()
    var hours = time.getHours()
    if (hours<12) {
    ampm = "AM";
    }
    else{
    ampm = "PM";
    }
    while(hours >12){
    hours = hours - 12;
    }
    if(hours<10)
    {
    hours = "0" + hours;
    }
    if(minutes<10)
    {
    minutes = "0" + minutes;
    }
    if(seconds<10)
    {
    seconds = "0" + seconds;
    }
    clock_txt.text = hours + ":" + minutes + ":" + seconds +" "+ ampm;


  7. Now go to frame2 of actions layer and press F6 to insert a new keyframe.
    Still keeping the play head on the frame2, go to action panel and copy paste the below mentioned script.

    gotoAndPlay(1);
Congratulations!! your digital clock is ready.
Press Ctrl+Enter to view your clock.

Berikut adalah hasil yang telah saya buat.

Saya ada uploadkan failnya di https://sites.google.com/site/authormasni/

Cubalah...


Tuesday, 29 May 2012

Refleksi - Aktiviti-aktiviti dari apps4

Alhamdulillah, selesai juga tugasan di dalam apps4.

Sila rujuk : https://sites.google.com/site/authormasni/


Semoga ilmu yang perolehi memberi manfaat pada diri dan pengguna aplikasi.

Sunday, 27 May 2012

Reflection for Apps 4 - Types of interaction

Question 1
Create a multiple choice question that will provide a correct or  incorrect  response upon your answer. Please follow below example.

Saya cuba membuat soalan aneka pilihan dengan merujuk Ipad. Alhamdulillah berikut adalah langkah-langkahnya.

1- New file, pada time line...
2- Layer Question - Taipkan soalan sahaja.


3- Layer Button - Binakan 4 button untuk jawapan.

Action script untuk setiap button
 jika jawapan salah - on (release) {respon = "Cuba lagi."}
 jika jawapan betul - on (release) {respon = "Tahniah"}


4- Layer Respon - mengandungi text field berjenis dynamix text. Ia digunakan sebagai respon kepada pengguna jika jawapan yang dipilih benar atau salah.


5- Layer action diletakkan action script stop untuk memastikan paparan tidak diulang tanpa henti.


Question 2 :
Create one application that allows users to type an input of question provided. Follow below example.

1- Layer background - taipkan tajuk/ tema soalan - static text
2- Layer question - a) taipkan soalan kuiz - static text
                               b) masukkan text entry sebagai input text.
                                    ->Pengguna akan masukkan jawapan di sini.
                               c)  masukkan text entry sebagai dynamix text.
                                    ->Pengguna akan dapat respon tentang jawapan yang diberi.


3- Layer button - pilih satu button play dari library
                          - pada button tersebut, taipkan action script untuk semak jawapan pengguna.

on (release) { if (answer == "jam")
{respon = "Correct!";}
else
{respon = "Incorrect. Your answer "+ answer +" is incorrect.";
}
}

on (release, keyPress "<Enter>")
{if (answer == "jam") {respon = "Correct!";}
else
{respon = "Incorrect. Your answer "+ answer +" is incorrect.";
}
}

4- Layer stop
taipkan action script  stop ( );


Question 3 : 
Create a Main Menu that contain following actions :
 - A button that navigate from 1 page to another
 We can use action script to link one scene with other scene.
  Put this action script behind the button.
  on (release) {gotoAndPlay(" scene name", frame number);}  


 - A button that navigate from 1 scene to particular frame of different scene 


 - A button that navigate users to other webpage.
The action script to link one scene to other webpage.
on (release) {getURL("http://www.moe.gov.my/jpnjohor/v6/index2.php");}


Question 4
Based on your own creativity, create a simple flash applications that involves drag and drop function like an example below.

Layer epal - import from library picture of apple
Layer pokok - import from library picture of tree
Behind a movie clip of each apple, write down this action script :

on (press) { startDrag(this, true); }
on (release){stopDrag();}

// Tq Miss Farhana because you teach me how to do this activity.

Paparan pada fail Flash

 Paparan apabila fail dimainkan


 Paparan setelah buah epal di drag n drop pada pokok.


Alhamdulillah, siap juga akhirnya latihan apps4 yang diberikan sejak 2 minggu yang lalu. Thanks pada Dr Zaida, Cik Nurul Farhana serta kawan-kawan yang telah membantu menyiapkan latihan ini.


Wednesday, 23 May 2012

Reflection Apps 2 - Drawing in Flash


Apps 2 – Drawing in Flash 

1. Draw  a view of the beach as in example.


2. Explain the tools that you are using during this activity
·         Line tool digunakan untuk membina garis lurus.
·         Pilih selection tools untuk membengkokkan garis lurus bagi membentuk gunung,  ikan, burung, bintang, sampan, kerusi dan payung.
·         Gunakan subselection tool untuk mengubah kedudukan lukisan.
·         Pencil tool digunakan untuk melukis garisan bengkok seperti tali yang mengikat sampan
·         Jika nak bawa objek yang sama ke tempat lain contohnya ikan, maka gunakan Free Transform Tool untuk select and paste ke tempat lain.
·         Shape tool  digunakan untuk melukis bentuk geometri seperti segiempat, oval, poligon.
·         Pastikan garisan tidak putus supaya tiada masalah semasa mewarna lukisan nanti.
      3. Once you are done, colour your drawn image with an appropiate tool in flash. Describe the tools that you are using.
·         Brush tool digunakan untuk mewarna.
·         Untuk menghasilkan warna yang ada tone, boleh ubah di bahagian properties.
·         Gunakan Paint bucket tools untuk mewarnakan imej. Pastikan imej tidak mempunyai garisan terputus jika nak gunakan paint bucket tools. 


4. Create a new flash file and draw a cartoon image using Onion Skin Tools, and then convert it to graphic symbol.


Step : 
Google picture of Sizuka... 
Open New file in Flash... 
F7 to insert new frame... 
Import file to library... 
Drag the picture of Sizuka in frame one... 
Activate the onion skin...
Trace the picture on frame two... 
Finished trace... 
Delete frame one... 
To colour the picture... 
Using brush tools and paint bucket...

Saturday, 12 May 2012

Differences between motion tweens and classic tweens

Flash Pro supports two different types of tweens for creating motion. Motion tweens, introduced in Flash CS4 Professional, are powerful and simple to create. Motion tweens allow the greatest control over tweened animation. Classic tweens, which include all tweens created in earlier versions of Flash Pro, are more complex to create. While motion tweens offer much more control of a tween, classic tweens provide certain specific capabilities that some users need.
The differences between motion tweens and classic tweens include the following:
  • Classic tweens use keyframes. Keyframes are frames in which a new instance of an object appears. Motion tweens can only have one object instance associated with them and use property keyframes instead of keyframes.
  • A motion tween consists of one target object over the entire tween span. Classic tween allows tweening between two keyframes, containing instances of the same or different symbols.
  • Both motion tweens and classic tweens allow only specific types of objects to be tweened. When you apply a motion tween to non-allowed object types, Flash offers to convert them to a movie clip when the tween is created. Applying a classic tween converts them to graphic symbols.
  • Motion tweens consider text a tweenable type and do not convert text objects to movie clips. Classic tweens convert text objects to graphic symbols.
  • No frame scripts are allowed on a motion tween span. Classic tweens allow frame scripts.
  • Any object scripts on a tween target cannot change over the course of the motion tween span.
  • Motion tween spans can be stretched and resized in the Timeline and are treated as a single object. Classic tweens consist of groups of individually selectable frames in the Timeline.
  • To select individual frames in a motion tween span, Ctrl-click (Windows) or Command-click (Macintosh) the frames.
  • With classic tweens, eases can be applied to the groups of frames between the keyframes within the tween. With motion tweens, eases apply across the entire length of a motion tween span. Easing only specific frames of a motion tween requires the creation of a custom ease curve.
  • You can use classic tweens to animate between two different color effects, such as tint and alpha transparency. Motion tweens can apply one color effect per tween.
  • Only motion tweens can be used to animate 3D objects. You cannot animate a 3D object using a classic tween.
  • Only motion tweens can be saved as Motion Presets.
  • With motion tweens, you cannot swap symbols or set the frame number of a graphic symbol to display in a property keyframe. Animations that include these techniques require classic tweens.
  • There can be more than one classic or motion tween on the same layer, but there can't be both types of tween on the same layer.

Thursday, 10 May 2012

Macromedia Flash: Symbol Types

Macromedia Flash: Symbol Types

http://www.dummies.com/how-to/content/macromedia-flash-symbol-types.html

 
Flash offers a way to simplify your work, called symbols. A symbol can be any object or combination of objects, animation, or a Web button. When you create a symbol, the objects (or animation) become one symbol. The difference is that Flash stores the definition of the symbol in the Library. From the library, you can now effortlessly insert multiple copies of the symbol into your movie. Each copy is called an instance.
Besides making your life easier when you want to use a set of objects more than once, symbols have another advantage: They significantly reduce the size of your files. Rather than store each instance you use, Flash stores one definition for the symbol and only refers to the definition each time you display an instance of the symbol. Turning a bunch of objects into a symbol helps reduce file size even when you use the symbol only once, because Flash remembers only one object rather than many. Backgrounds that aren't animated can therefore be combined into one symbol.
You can place symbols inside other symbols. Used this way, symbols are the building blocks for complex graphics and animation. Motion-tweened animation requires symbols, groups, or text, so you often create symbols when preparing to animate.
So, symbols are all-around good guys, and you should use them as much as possible.
Flash makes available three types of symbols. Each type is made up of a group of objects or animation, but each type has a different purpose. Understanding these types is very important to understanding symbols and Flash animation in general.

Using graphic symbols

Graphic symbols are the simplest and most obvious type of symbol. When you create a Flash movie, you create objects on the Stage. Some objects may remain still, such as backgrounds. You animate other objects — after all, what is Flash for? Use graphic symbols for collections of static objects or for animation.
You create graphic symbols to reduce the size of your file and to make it easier to add multiple copies of a graphic to your movie. Symbols are stored in the Library and are available to not only the movie in which you created them but also any other movie. Therefore, using symbols is a good way to store graphic images for use in Flash movies. You don't have to re-create the wheel.
Flash ignores sounds or actions inside graphic symbols. Actions are the key to creating interactive movies. For that reason, turn animation into graphic symbols only when the animation is simple. Graphic symbols are always placed on the main Timeline of the movie.

Using movie clip symbols

A movie clip is like a movie within a movie that you can manipulate by using interactive controls (also called actions, created with ActionScrip). Movie clips are crucial for complex animation and especially interactive animation. A movie clip doesn't take place on the main Timeline; instead, it has its own Timeline. For example, you can go to a movie clip at any time, play it, and then return to where you left off on the Timeline. You can also attach movie clips to buttons.
Flash comes with several components, special movie clips that allow you to add user interface elements — such as radio buttons, check boxes, and scroll bars — to your movies. Choose Window --> Components and drag one of your choices to the Stage. Then choose Window --> Component Parameters to set the parameters of the component. For example, you can insert a list box and then add all the items (called labels on the Component Parameters panel) you want on the list.

Using button symbols

Button symbols create buttons — those little graphics that you click in Web sites to take you to other places on the site or the Internet. In Flash, you can use buttons in the same way, but you can also use buttons to let viewers decide whether they want to see a movie — when they click the button, the movie starts. You can also use advanced scripting to create buttons that control interactive games and other viewer activities. However you want to use buttons, button symbols are the way to start. You can add movie clips and interactive controls to buttons.


Flash Symbols

Basic concepts of flash symbols - graphics, buttons and movieclips

In this tutorial you'll learn the basic concepts of Flash symbols, symbol types (graphics, buttons and movieclips), creating and using them.

What is a Flash Symbol?

A symbol is a reusable object used/created in Flash. A Symbol can be reused throughout 
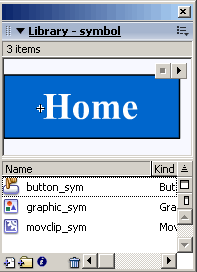
your movie or imported and used in other movies. There are three types of symbols: Graphics, Buttons, and Movieclips.
A copy of a symbol used in the movie is called an Instance, which can have its own independent properties (like color, size, function, etc.) different from the original symbol. All symbols used in a flash movie are stored in the Library from where you can drag-and-drop new instances of the symbols into your movie. When a symbol is edited all of its instances get updated, but changing the properties, effects or dimensions of an instance of a symbol does not affect the original symbol or other instances.

Importance of using Flash Symbols

Using flash symbols is very crucial to the file size of your Flash movie. The Flash file size depends largely on the size of all the graphics and texts used in the movie (both symbols and non-symbols) - here the major advantage of using symbols is that a symbol's size is taken into consideration only once even if it is used a hundred times - this is the true power of Flash. Unused symbols in your library are not counted in the size of your movie.
Important Tip: Get used to using symbols in flash right from the beginning and name them neatly for easy maintenance. It is a very tough job optimizing your file size if you don't use symbols from scratch!

The Three Types of Symbols

Graphic symbols are reusable static images that are used mainly to create animations. Any drawn vector/plain text/imported bitmap (photo), or combinations of these, can be converted into a single controllable object: as a graphic symbol. They have only one frame in their timeline. Learn how to create a graphic symbol.

Button symbols are used for timeline navigation - They add interactivity to the movie and respond to mouse clicks, key press or rollovers/rollout, and other actions. You define the graphics associated with various button states (Up/Over/Down/Hit), and then assign actions to the instance of a button. They have 4 frames in their timeline - one each for the up, over and down states, and one to define the hit area of the button. Learn how to create a button symbol.

Movieclip symbols are reusable pieces of flash animation - consisting of one or more graphic/button symbols - thus they are flash movies within your flash movie. They have their own non-restricted Timeline (any number of layers and frames - just like the main timeline) that plays independent of the main movie's Timeline. The best thing about using movieclips is that you can control them from actionscript - you can change their dimensions, position, color, alpha, and other properties and can even duplicate and delete them. Learn how to create a movieclip symbol.

Reflection for Apps 3 - Kelas Authoring Minggu Ke 12 (10 Mei 2012)


Salam...
Hari ni di dalam Apss3 - Creating Animation.

Reflection for  Apps 3

First Tutorial : Create an animated bouncing ball that could change its positions, colours and size along preferred timeline.


1.      Gunakan “Oval Tool”untuk lukis bentuk bola. 
2.      Warnakan bola dengan menggunakan “Paint Bucket Tool”.
3.      Setelah siap lukis bola, Klik “Modify” pilih “Convert to Symbol” namakan bola tersebut type pilih “Graphic” dan klik “Ok”.
4.      Pilih frame 10 dan right klik dan pilih “Insert Keyframe” dan ubah kedudukan bola mengikut kehendak anda.
5.       Langkah 4 diulang sehingga bola terjatuh di atas lantai.
6.       Ubah warna background dengan cara : Right Click on stage > Document Properties > Change the Background Colour
7.       Untuk melihat hasil, klik pada “Control” dan pilih “Test Movie”.


Beberapa perkara yang perlu diambil perhatian :
1-      Change its positions - using motion tween. Using insert key frame, edit the place of the ball.  Move the marker first before you put the motion of the ball.
2-      Change its colours -click at the ball -  properties - colour effect - style - tint
3-      Changes size of ball - click at the ball - using free transform tools - edit the size of ball using symbol - graphic, button and movie clip
  

Second Tutorial : Create a new file and change a text form into a any shape 

Langkah-langkah 
1) Taipkan teks
2) Pilih modify kemudian breakpart untuk asingkan huruf dalam perkataan
. do it again go to modify n choose breakapart. insert keyframa(f6) in frame 25. In frame 25, delete the text n draw a star, using poligon tool. click any frame between frame 1 to 25, n go to properties, tween n choose shape. done.

Third Tutorials : Use motion guide technique to guide ant move a long the tunnel .

Saya ubah jadi Sizuka gi sekolah masih guna motion guide.

1) Create a background layer to show Sizuka and the pathway of the bus.
2) Right Click on  layer and select "Add Classic Motion Guide".
3) Insert keyframe at frame 5, 10, 15... 75
4) Rotate the bus position to show that it is facing the right direction while moving
 5) Right click somewhere between the 1st and the 75th frame layer and select "Create Classic Tween"
6) Check the tween's properties. Make sure "Orient to Path" is selected
7) Adjust the frame rate at the bottom of the Timeline to "10" fps to show that the "bus" is moving in slow motion
8) Untuk melihat hasil,  Ctrl- Enter.
9) Tambah frame pada layer jika paparan terlalu pantas. Insert Keyframe selepas frame 25 bagi membolehkan paparan akhir dipaparkan lebih lama.


Fourth Tutorials : Try to animate the cartoons mouth by applying frame by frame technique in Adobe Flash.

Saya buat animasi sempena hari guru. Banyak frame digunakan. FPS dikurangkan untuk memastikan penonton dapat memerhatikan gerak mulut guru tu.

1)      Trace a teacher picture.  Save in layer teacher
2)      Insert keyframe, change mouth and teacher eyes.
3)      Repeat the process sehingga hasil dikehendaki tercapai.
4)      Saya masukkan image sebenar dan sedikit ucapan sempena hari guru 2012.
5)      Untuk melihat hasil,  Ctrl- Enter.
6)      Tambah frame pada layer jika paparan terlalu pantas. Insert Keyframe selepas frame 25 bagi membolehkan paparan akhir dipaparkan lebih lama.


Friday, 4 May 2012

Instructions : Animating the Cartoon

Salam...

Belajar sendiri berbantukan youtube... melukis kartun menggunakan Flash CS3.
Untuk hari ini belajar melukis secara menekap gambar asal... or onion skin tools.


Onion skin tool is an interesting tool that helps you throughout your drawing.

Belum berjaya melukis kartun... cuba buat logo dulu...


Cuba menekap gambar yang rasanya paling mudah... setelah puas menggoogle...


GAMBAR ASAL

HASIL MENGGUNAKAN ONION SKIN TOOLS. 
he.. he... kena gelak je ngan mouse kalau ada tiger macam ni...

Hasil kerja terkini... pada Sabtu 5 Mei 2012...


 Alhamdulillah... berjaya juga akhirnya.


Berikut pula adalah langkah seterusnya jika dah boleh lukis kartun banyak2... buat animasi pula...


Instructions : Animating the Cartoon

First
Open a new Flash FLA movie: Click "File" on the menu bar and choose "New." This opens the New Document dialog box. Click "Flash File (ActionScript 3.0)."

Second
Import or draw the first frame of your cartoon on the stage. You can create your cartoon frames in an external drawing program, such as Illustrator, or use Flash's drawing tools to draw them. Each frame in an animation is called a "pose." Each pose is a slight variation of the previous pose.

Third
Right-click the next frame in the Timeline panel and choose "Insert Blank Keyframe" from the fly-out menu. A blank keyframe gives you a blank stage for creating the next pose.

Fourth
Import or draw the next pose on the stage, changing the pose slightly. What you do here depends on the type of animation you want. If your animation simply shifts an object from one location to another on the stage, move the object slightly in the direction you want it to shift. To simulate the movement of one or more body parts, reposition, or create a new pose from, the parts of the cartoon figure you want to animate.

Fifth
Continue inserting blank keyframes and moving and manipulating your object in each frame until you have completed the animation sequence.

Sixth
Test the movie (click "Control" on the menu bar and choose "Test Movie"). The animation should play frame by frame just as you manipulated it across the stage and timeline.

Thursday, 3 May 2012

Kelas Authoring Minggu ke 11

Salam...
Hari ni masih guna Apps1... and Ipad... Kami belajar apakah fungsi shape tools di dalam Flash, berbincang aplikasi yang boleh dibina menggunakan Flash seperti web banner, games, courseware and animation.

Interaksi di dalam Flash juga pelbagai... antaranya menggunakan Button dan Hotspot, Text dan drag n drop.

Then, kami juga explore beberapa jenis text box yang terdapat dalam Flash.
Antaranya :
a) Static text - digunakan untuk memaparkan aksara yang tidak perlu diubah. Contoh... arahan untuk pengguna atau perkataan biasa.

b) Input text - digunakan apabila ingin mendapatkan maklumat dimasukkan oleh pengguna. Pengguna boleh menaip masuk maklumat di ruangan yang disediakan.


c) Dynamic text - use when we need to display character that are updated or that change at runtime.


Hari ini kami diperkenalkan pula dgn Apps2... di dalamnya mengandungi youtube cara-cara melukis menggunakan Flash CS3. Interesting... seolah2 berada di oversea pula walhal kat oversea... budak tadika dah pegang ipad.

Hari ini belajar Basic Drawing dulu...lukis garisan, lukis objek guna line tool dan selection tool. Kemudian cuba warnakan... Best juga sebab inilah peluang untuk mempamerkan bakat melukis yang tak seberapa...

Inilah hasil nya...(3 Mei 3012)


Cuba lagi edit.. (4 Mei 2012) ada bhgn yang tak boleh di warnakan guna paint bucket... ada kebocoran kot... tapi dah puas check... entah kat mana...


Bila org matematik di suruh melukis... inilah hasilnya...
Tak pe... boleh diperbaiki... insya allah...


Hasil terkini pada 5 Mei 2012. Setelah belajar dengan kengkawan iaitu Fadlee dan Halizah.